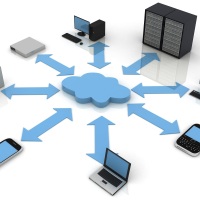
Over the past few years, many businesses have been taking advantage of technological advancements to both save money and make major improvements to the way that their employees connect with each other, the company and the rest of the world. For some organizations, the utilization of new technology is one which can save money and improve cash flow. For others, they’re looking for ways to help their company grow and expand without running into IT obstacles. Out of all of the options open to small and medium businesses, one of the biggest innovations to infiltrate these companies in recent history is cloud networking.
Search results for: “label/Networking”
-

How Social Networking Becomes Easier with iPhone Apps
The most common social networking sites are Facebook, Twitter, LinkedIn, and Orkut. These sites have become a part of daily life mainly for the present generation, where youngsters to business tycoons make sure they update their status every minute a day. The advantages of social networking sites include, it holds instant messaging services, you can connect with new and old friends, post blogs, share pictures, email, send greetings, and you can text short messages directly to your friend mobile phones. The networking sites play a great role to connect with new friends and consumers.
-

A List of Common Tags in a Blogger Blog Post Header
There are many labels and fields that can be modified to change the look of your Blogger blog’s post header. You can choose to use all the available fields, some of the fields, or none of the fields. Since the fields are related to each blog post, you can even display them anywhere on your post, even the footer.
In this post I will list some of the most common data tags you may find in a Blogger template. By using the tags in the list, you can control what information is displayed in each of your blog posts.
-

Socialize Online with Social Networking Software
With social networking growing by leaps and bounds, it can be difficult to keep track of all of your social media profiles. Keeping an eye on feeds and replies on Twitter can take up a lot of time, especially if you have multiple accounts. Add sites like Facebook and MySpace to the mix, and it quickly becomes overwhelming. Fortunately there are many types of social networking software to help you manage your social media.
(more…) -
Keeping Old Friends, Making New Ones: Social Networking Alternatives to Facebook
The rise of social networking has been decried by several observers for decreasing sociability and actual face time. The fact is social websites provide a convenient and easy method to not only communicate with old friends but also make communications more personal. Instead of a letter once a month, it is possible to continue the relationship at the same level of intensity possible for next-door neighbors.
Of course, keeping old friends is only part of the picture. Many people have interests that are not shared by individuals in their geographic proximity. This is especially common in rural areas. Even in densely populated areas, it can be difficult to locate those who share your interests or hobbies. Social networking provides a solution to these problems, provided you are aware of the possibilities.
-
Data Archiving Method
I have recently begun backing up my data such as photos (both digital and film), videos, and other files so that in case something happens, I will not lose my irreplaceable data. There is always much discussion on the best ways to archive data, and I have my way. Many may agree and disagree with my method, but this one works for me.
In this post I will explain my method, as well as the reasons I chose to use the tools and storage devices.
Organizing and Labelling the Data
Before I begin to archive the data, I first organize the data, as well as set some labeling standards. The archival process is much easier once you have organized all your files, photos, and whatever else you will be archiving.
If you plan to scan photos, slides, negatives, or other documents, you should separate them into groups, either by date or people. This will help you to keep certain items together within your archives.
Once you have organized your data, you should create a labeling scheme to make it easier for you to find the data that you need. I have decided to backup my data on DVDs (I’ll explain why below), so each DVD is stored in a jewel case with a label assigned to the case. The label contains the following:
- Title – I provide a descriptive title to indicate the contents of the DVD.
- Years – I indicate the years covered by the data on the DVD. This helps to order the DVDs in chronological order, even if they weren’t burned in that order.
- Created Date – The date that I created the DVD. This will come in handy in the future to determine how old the DVD is, and whether I should create a new copy of the DVD.
- Catalog Name – This is a unique name that I give each DVD so I can organize them. I came up with a naming convention that indicates the type of data on the DVD.
- Family – This field contains the last name of the family represented by the data on the DVD. This helps to find data for a specific family name.
I also decided to use coloured jewel cases that will help indicated the data on each DVD. For example, for photos I use a black jewel case, and videos will be stored in blue cases. You can easily purchase a box of coloured jewel cases for cheap.
Once I have organized my data, and came up with a labeling scheme, the next step is to start determining how to store the data.
Archiving Media
This is probably the most debated point with regards to archiving data. Many people have their opinions about which media is best. Each media type has its pros and cons, so choose one that works for you.
I have chosen to archive my data on single-layer DVD discs. I chose this method because they are relatively affordable, can hold a lot of data and can be easily stored. When I do make an archive disc, I always make two copies, so that if one becomes corrupted in the future, then I can retrieve my data from the copy.
I have, however, not chosen just any DVD discs to use for archiving. I have chosen to use DVD+R discs from Taiyo Yuden. The DVD+R format has several benefits over the DVD-R specification, with one of the benefits being better error management. Taiyo Yuden discs are known as very reliable discs, so I chose them for my archives.
Just in case you are wondering where you can purchase Taiyo Yuden discs, I discovered that very few stores, if any, carry them. I ordered mine online, as most people probably do. I only know of two online stores where you can order them for those living in Canada or the United States:
- Canada – Blankmedia.ca.
- United States – Supermediastore.com.
If you know where else you can purchase these DVDs, I would like to know. Be careful, however, as many places offer DVDs that say they are Taiyo Yuden, when in fact they are fakes.
I burn the DVD using Nero, using the catalog name as the DVD name, and perform a verification after each burn to ensure that the data was written without any issues. Once the burn has completed, I print the label, and then insert the label into the jewel case with the DVD. I write the catalog name on the DVD using a water-based CD marker.
When I’m done with my burning, I move one of the copies offsite to prevent all my archives from being destroy if something were to happen to my home.
Many people have discussed the life of a burned DVD, and whether their data will be available in 50 years. I think that as long as the data is readable after 5 years I should be good. I’ll probably move my data to the next generation of storage media, so won’t care if these DVDs can be read in 50 years.
Summary
In this post I have provided an overview of my method for archiving my data. I use a simple labeling system as well as DVD+R discs to organize and store my data. For more security, and piece of mind, I also always burn at least two copies of the data, just in case one is destroyed. Finally I move one of the copies offsite to losing all archives if something were to happen.
You can choose to follow my method, or come up with your own. You should always create a system that works best for you.
-
Grouping Posts by Categories in Blogger
I recently had questions regarding adding categories to a Blogger blog. Although it doesn’t appear like Blogger supports categories, it in fact does and they can be added easily. In one of my recent posts titled Blog Designing Tips for New Bloggers, made mention of categories and that all new blogs should include a listing of them in their sidebar.
In this post I will explain what categories are, and how to incorporate them into your Blogger blog.
About Categories

Each post on a blog is usually about a specific topic, and a blog may have several topics overall. When you create many posts about a topic it would be nice to allow the visitor to view all posts that are related to that topic. This is where categories come into play.
A category is simply a tag, or label for a post. When you add a post to a category you simply begin to organize your blog in a meaningful manner. You then list you categories on your blog and when a visitor clicks the category link, a new page displaying all posts in that category is shown to the visitor.
It is important, however, not to create too many categories. I believe roughly 15 categories is a good number to have on your blog. Too many and your listing would be too large to read easily.
In the next section I will show you how to implement categories in a Blogger blog.
Labels = Categories
In the Blogger world you can attach labels to each post that you publish. These labels can then be listed in your blog’s sidebar as links. When a visitor then clicks one of these links, it will take them to a Web page that displays all posts that are assigned that label.
To add labels to your blog, use the following steps:
- Log in to your Blogger account, and then click the Layout link to the blog you want to change.
- Click the Add a Page Element where you want the categories to appear.
- From the list of page elements, click the Add to Blog button under Labels.
- Enter a title, and then click Save Changes. This should add the new Labels element to your blog.
- Now when you create or edit a post, enter some labels in the text box labelled Labels for this post. Each label should be separated by a comma.
- When you publish the post, a label will show up on your blog with the number of posts associated with it.


-

3 of the Best Photo Editing and Sharing Apps For Android and iPhone
It is amazing how far technology has gone into simplifying our daily activities… and the photography industry seemed to have received most of this positive impacts.
Here’s what I mean; digital camera is one of the most popular consumer electronics in the market today with compact cameras and DSLR camera becoming more accessible to ordinary consumers. But what is more intriguing is how this technology has been successfully brought into the simplest gadgets we use every minute of the day… our mobile phones.

A few years ago, we would have been talking about buying a camera for camping events, sightseeing events and for other ceremonies we’d like to preserve their memories. But today, we can still have these moments perfectly covered with the high-end cameras that come with our mobile devices. And as if this is not enough, there are still many mobile apps out there designed to allow us complete control over our photos… allowing us to edit them to our taste. Whether you are an Android fan or prefer iPhones, you are not left behind. As a photographer myself, I give so much value in the ability to edit and share my pictures the moment I take them, through several applications. Here are three of the best photo editing and sharing apps for Androids and iPhones.